RetinaFace
Table of Contents
1. RetinaFace
1.1. Overview
RetinaFace 是一个 face detection 模型, 它的要点是 multi-task learning.
一般 face detection 的目标是:
- 检测出 class (face or background)
- 检测出 bbox
RetinaFace 的改进是通过把 landmark 做为辅助的目标能提高性能.
1.2. Network
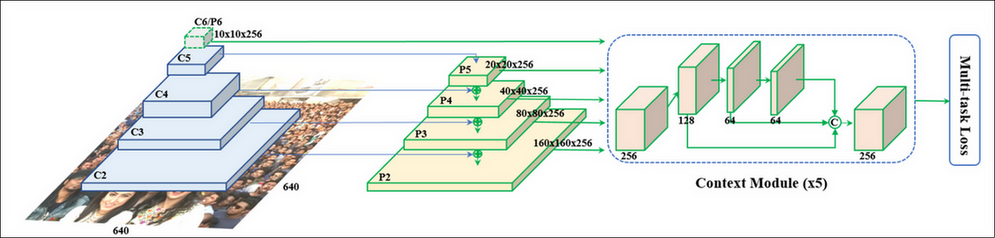
retinaface 实际上就是一个标准的 object detection 网络:
- 前面是一个 Feature Pyramid Networks
- 使用 resnet 或 mobilenet 做 backbone, 并取出其中某些层 c2~c6
- 用 1x1 conv 变成统一的 channel, 例如图中的 p2~p6, 大小分别为 160x160x256, 80x80x256, …, 10x10x256, 用来对应原图上不同尺度的 anchor
- \(p_n = p_n+ upsample(p_{n-1})\)
- 每个 feature 都通过一个 Context Module (SSH, https://arxiv.org/pdf/1708.03979.pdf) 做为一个变换, 这个变换会保持输入输出尺寸不变
把所有 feature 拼起来做为 neck
例如 10x10x256, …, 160x160x256 拼起来变为 34100x256, 表示对于 34100 个点的数据
- 接上不同的 detection head
loc head
通过一个 conv2d(2x4, 1x1) 的卷积把 256 维的 feature 变为 2x4, 表示一个点对应的两个 anchor 的坐标
cls head
conv2d(2x1, 1x1), 表示一个点对应两个 anchor 的 cls
landmark head
conv2d(2x5x4, 1x1), 表示一个点对应两个 anchor 的 5 个 landmark 的坐标
1.2.1. Context Module
https://arxiv.org/pdf/1708.03979.pdf 2017/11
这里参考了 SSH (Single Stage Headless) 的 context module, 所谓 context module, 是加入更大的卷积 (例如 5x5, 7x7) 扩大感受野.
retinaface 的 context module 是:
- mxmx256 通过 conv2d(128, 3x3) 变为 mxmx128
- mxmx128 再通过 conv2d(64, 3x3) 变为 mxmx64
- mxmx64 再通过 conv2d(64, 3x3) 变为 mxmx64
- 三次输出 concat 在一起又变回 mxmx256
1.3. Sample
假设:
- 输入为 160x160
- 使用 resnet50 做 backbone
- fpn 使用三个不同的尺度: 8, 16, 32
- 每个点有两个不同大小的正方形 anchor
1.3.1. model
class RetinaFace(nn.Module):
    def __init__(self, cfg = None, phase = 'train'):
        backbone = models.resnet50(pretrained=cfg['pretrain'])
        # layer2 输出为 (512, 20, 20)
        # layer3 输出为 (1024, 10, 10)
        # layer4 输出为 (2048, 5, 5)
        # 所以这里只用了三种尺度的 feature map
        self.body = _utils.IntermediateLayerGetter(backbone, {'layer2': 1, 'layer3': 2, 'layer4': 3})

        self.fpn = FPN(in_channels_list, out_channels)
        self.ssh1 = SSH(out_channels, out_channels)
        self.ssh2 = SSH(out_channels, out_channels)
        self.ssh3 = SSH(out_channels, out_channels)


        self.ClassHead = self._make_class_head(fpn_num=3, inchannels=256)
        self.BboxHead = self._make_bbox_head(fpn_num=3, inchannels=256)
        self.LandmarkHead = self._make_landmark_head(fpn_num=3, inchannels=256)


    def forward(self,inputs):
        # backbone
        # out[1].shape=(512, 20, 20)
        # out[2].shape=(1024, 10, 10)
        # out[3].shape=(2048, 5, 5)
        out = self.body(inputs)

        # FPN
        # fpn[0].shape=(256, 20, 20)
        # fpn[1].shape=(256, 10, 10)
        # fpn[2].shape=(256, 5, 5)
        fpn = self.fpn(out)
        # SSH
        # SSH 的输出尺寸不变
        feature1 = self.ssh1(fpn[0])
        feature2 = self.ssh2(fpn[1])
        feature3 = self.ssh3(fpn[2])
        features = [feature1, feature2, feature3]

        # 这里并没有把 feature concat 在一起再用 detecion head, 而是先分别用
        # detecion head 后再 concat 起来
        # bbox_regressions.shape=(1050, 4), 因为每个点有两个 anchor,  (400+100+25) * 2 = 1050
        bbox_regressions = torch.cat([self.BboxHead[i](feature) for i, feature in enumerate(features)], dim=1)
        classifications = torch.cat([self.ClassHead[i](feature) for i, feature in enumerate(features)],dim=1)
        ldm_regressions = torch.cat([self.LandmarkHead[i](feature) for i, feature in enumerate(features)], dim=1)

        output = (bbox_regressions, classifications, ldm_regressions)
        return output
1.3.2. anchor
class PriorBox(object):
    def __init__(self, cfg, image_size=None, phase='train'):
        super(PriorBox, self).__init__()
        # min_size 代表了三种尺度下两个 anchor 的大小, level 0 最小, level 2 最大
        self.min_sizes = [[4, 8], [16, 32], [64, 128]]
        self.steps = [8, 16, 32]
        self.image_size = image_size
        # 这里的 feature_maps 与网络输出的 feature map 尺寸一致
        self.feature_maps = [[ceil(self.image_size[0]/step), ceil(self.image_size[1]/step)] for step in self.steps]

    def forward(self):
        anchors = []
        for k, f in enumerate(self.feature_maps):
            # 针对每个 level 的 feature map
            min_sizes = self.min_sizes[k]
            for i, j in product(range(f[0]), range(f[1])):
                # 针对 feature map 的每个点
                for min_size in min_sizes:
                    # 针对每个点的两个 anchor 计算 center 和 长度, 与标准 ssd 不
                    # 同的是, 所有 anchor 都是正方形
                    s_kx = min_size / self.image_size[1]
                    s_ky = min_size / self.image_size[0]
                    dense_cx = [x * self.steps[k] / self.image_size[1] for x in [j + 0.5]]
                    dense_cy = [y * self.steps[k] / self.image_size[0] for y in [i + 0.5]]
                    for cy, cx in product(dense_cy, dense_cx):
                        anchors += [cx, cy, s_kx, s_ky]

        # 输出为 (1050, 4)
        output = torch.Tensor(anchors).view(-1, 4)
        return output
1.3.3. label
与 SSD 相同, 也会通过 encoder/decode 转换为相对于 anchor 中心的坐标
1.3.4. loss
与 ssd 相同, 但加上了一个针对 landmark 的 regression loss
Backlinks
Object Detection (Object Detection > RetinaFace): RetinaFace
