LLVM Backend
Table of Contents
1. LLVM Backend
1.1. overview
https://github.com/sunwayforever/llvm-toy
https://people.cs.nycu.edu.tw/~chenwj/dokuwiki/doku.php?id=llvm
Getting Started with LLVM Core Libraries
https://jonathan2251.github.io/lbd/
clang 编译 c 代码的过程大约为:
- 通过 clang 生成 llir
- 通过 opt 对 llir 进行优化
- 通过 llc 根据 llir 生成 target 指令
其中 llc 即是 llvm 的 backend 的入口
llvm backend 的主要步骤是:
- instruction selection
- target lowering
- llir -> SelectionDAG
- combine1
- legalize
- combine2
- isel
- SelectionDAG -> MachineDAG
- peephole optimization
- target lowering
- scheduling
- MachineDAG -> MachineInstr
- scheduling
- register allocation
- prolog/epilog insertion
- codegen
- MachineInstr -> MCInst
- MCInst -> asm/obj
整个 backend 工作的过程都是通过各种 pass 驱动的, 例如:
- instruction selection 对应
addISelPasses - register allocation 对应
addMachinePasses - codegen 对应
addAsmPrinter
一些 debug 的方法:
- `llc –debug-pass=Structure` 可以看到所有调用到的 pass
- `–print-before-all –print-after-all` 可以看到 pass 执行的结果
- `llc –debug` 可以看到 debug 信息
- `llc –debug-only=xxx` 可以只看某个 pass 的 debug 信息
- 后面提到的 `–view-xxx-dags`
1.2. TableGen
1.3. instruction selection
https://eli.thegreenplace.net/2013/02/25/a-deeper-look-into-the-llvm-code-generator-part-1
以下面代码为例:
float MUL(float x, float y) { return x + y; }
1.3.1. llir
$> riscv-clang test.c -emit-llvm -c -O2
$> riscv-llvm-dis test.bc
$> cat test.ll
...
define dso_local float @MUL(float noundef %x, float noundef %y) local_unnamed_addr #0 {
entry:
  %add = fadd float %x, %y
  ret float %add
}
...
llc 接受几个参数, 可以显示 SelectionDAG 不同阶段的 dag:
init
通过
--view-dag-combine1-dags可以查看 init 之后 (combine1 之前) 的 SDAGcombine1
通过
--view-legalize-dags查看 combine1 之后 (legalize 之前的) SDAG, 以下同理legalize
–view-dag-combine2-dags
combine2
–view-isel-dags
isel
-view-sched-dags
- sched
1.3.2. SelectionDAG
SelectionDAGBuilder 用来生成最初的 SDAG (SelectionDAG), RISC-V 相关的代码主要在
RISCVISelLowering.cpp, 实际上, 生成原始的SDAG/combine/legalize 相关的代码称为
TargetLowering (或者 ISelLowering)
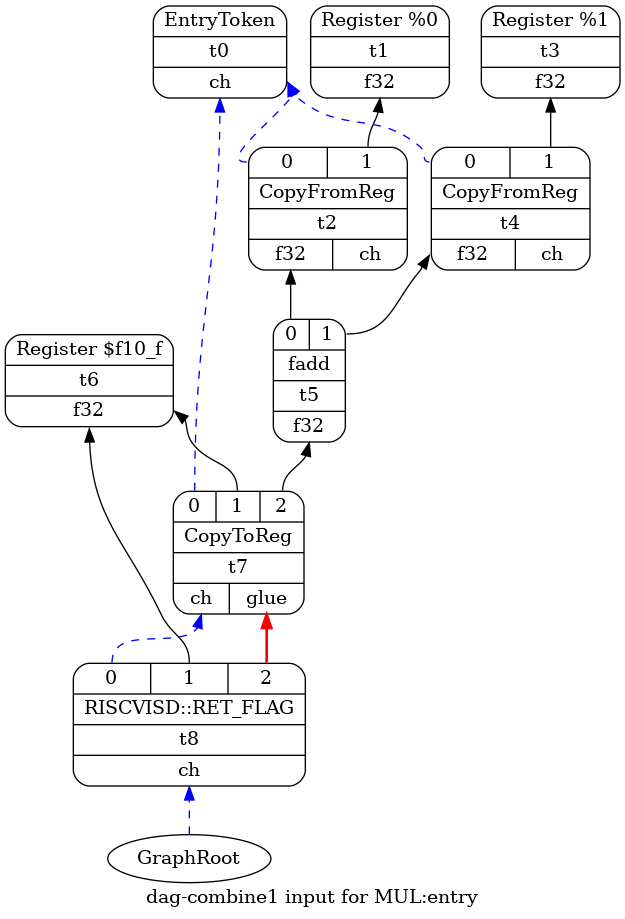
$> riscv-llc test.bc -view-dag-combine1-dags
$> dot -Tpng tmp/dag.MUL-cb5dd4.dot -o a.png

- 黑色实线: 数据依赖
- 蓝色虚线: chain, 即两者存在隐式的依赖关系
- 红线实线: glue, 两者需要 `glue` 在一起, 中间不能插入其它东西
其中 DAG 中 node 的类型例如 fadd 定义在 ISDOpcodes.h, 和 gcc 的 optab 有些类似
可以把 SDAG 看做 gcc rtl, 但与 gcc 不同的是, 生成 SDAG 时并不需要 td, td 中定义的 pattern 只是用来 isel 时做匹配.
这个过程基本是 target 无关的, 但也有例外, 例如 target 需要实现 LowerCall, LowerReturn 等在 DAG 中生成 target 相关的 node. 以 LowerReturn 为例, 它需要根据调用约定生成一些 CopyToReg, 最终生成 target 相关的 ISD, 例如 RISCVIDS::RET_FLAG
1.3.3. combine
DAGCombiner 是在 SDAG 上做的 optimization, 这个过程是 target 相关的: 它会执行
target 定义的 PerformDAGCombine, 例如 RISCVTargetLowering::PerformDAGCombine
例如, 通过 combineSelectAndUse 把 `(sub x, (select cond, 0, c))` 替换为
`(select cond, x, (sub x, c))`
DAGCombiner 在 legalize 前后都会进行, 它的任务和 isel 时的 pattern 匹配有些类似, 相当于把 isel 时的一些复杂的匹配拿出来用代码实现了, 例如可以通过 DAGCombiner 把一些 bit 操作替换为 extract/insert 指令
1.3.4. legalize
如果 target 不支持 SDAG 的某个 node 或数据类型, 需要在 legalize 和 legalize type 时转换成 target 支持的 node 和类型, 或者生成对 libcall 的调用, 这个过程是 target 相关的.
RISCVTargetLowering 负责告诉 SelectionDAGLegalize 哪些 opcode 需要进行哪种形式的 legalize: expand, promotion, libcall, custom
1.3.4.1. expand
假设 target 声明不支持 SUB, 且其 operation action 为 expand, 则 legalize 时会针对 SUB 调用 ExpandNode, 后者会把 SUB(A,B) 替换成 ADD(A,-B). 如果 expand 失败
(例如 target 不支持 ADD 或 XOR), 则最终会变成一个 libcall.
expand 的规则是和 target 无关的, ExpandNode 针对某些 opcode 实现了一系列的
expand 规则, target 只需要提供 isOperationLegal 的信息即可
bool SelectionDAGLegalize::ExpandNode(SDNode *Node) {
    switch (Node->getOpcode()) {
        case ISD::SUB: {
            EVT VT = Node->getValueType(0);
            assert(
                TLI.isOperationLegalOrCustom(ISD::ADD, VT) &&
                TLI.isOperationLegalOrCustom(ISD::XOR, VT) &&
                "Don't know how to expand this subtraction!");
            /* -A = (~A) + 1 */
            Tmp1 = DAG.getNOT(dl, Node->getOperand(1), VT);
            Tmp1 =
                DAG.getNode(ISD::ADD, dl, VT, Tmp1, DAG.getConstant(1, dl, VT));
            Results.push_back(
                DAG.getNode(ISD::ADD, dl, VT, Node->getOperand(0), Tmp1));
            break;
        }
    }
}
gcc 的 optabs.cc 中也有类似 expand 的处理, 以 abs 为例, 在 expand_abs 时会检查 abs_optab 是否在 md 中有对应的实现, 如果没有, 则按预定义的规则进行 expand.
除了针对 node, data type 也可以 expand, 例如假设不支持 int64 的乘法, 则可以把它拆分成两个 int32, 用 32 位乘法模拟 64 位乘法, 参考
DAGTypeLegalizer::ExpandIntRes_MUL
1.3.4.2. promotion
假设不支持 32 位乘法, 通过 PromoteNode 可以把 int32 promote 成 int64, 使用 64 位乘法. 参考 DAGTypeLegalizer::PromoteIntRes_SimpleIntBinOp
1.3.4.3. libcall
类似于 gcc optab_libfunc
1.3.4.4. custom
expand, promotion, libcall 相当于某种形式的 legalize 模板, custom 则需要完全由
target 决定如何 legalize 某个 opcode, 例如 RISCVTargetLowering::LowerOperation
和 RISCVTargetLowering::ReplaceNodeResults
custom 和 gcc 中的 define_expand 有些类似
1.3.5. MachineDAG
DoInstructionSelection 的作用是根据 target description (td) 中定义的 pattern和
predicate 去匹配对应的 target instruction, 把 SelectionDAG 转换为MachineDAG. 和
gcc 的 recog 类似. 生成 MachineDAG 是 isel 的主要功能, 称为 SelectionDAGISel (或
DAG2DAGISel)
例如 RSICVInstInfoF.td 中定义的关于 FADD_S 的 pattern:
def : PatFprFprDynFrm<any_fadd, FADD_S, FPR32>;
具体的匹配过程为:
- llvm-tblgen 通过 `-gen-dag-isel` 参数扫描 td 文件, 生成
RISCVGenDAGISel.inc, 后者与 gcc 的 recog 类似, 是一个巨大的 switch-case SelectionDAGISel会扫描 SelectionDAG, 根据 RISCVGenDAGISel.inc 中的 pattern 把 SelectionDAG 转换为 MachineDAG
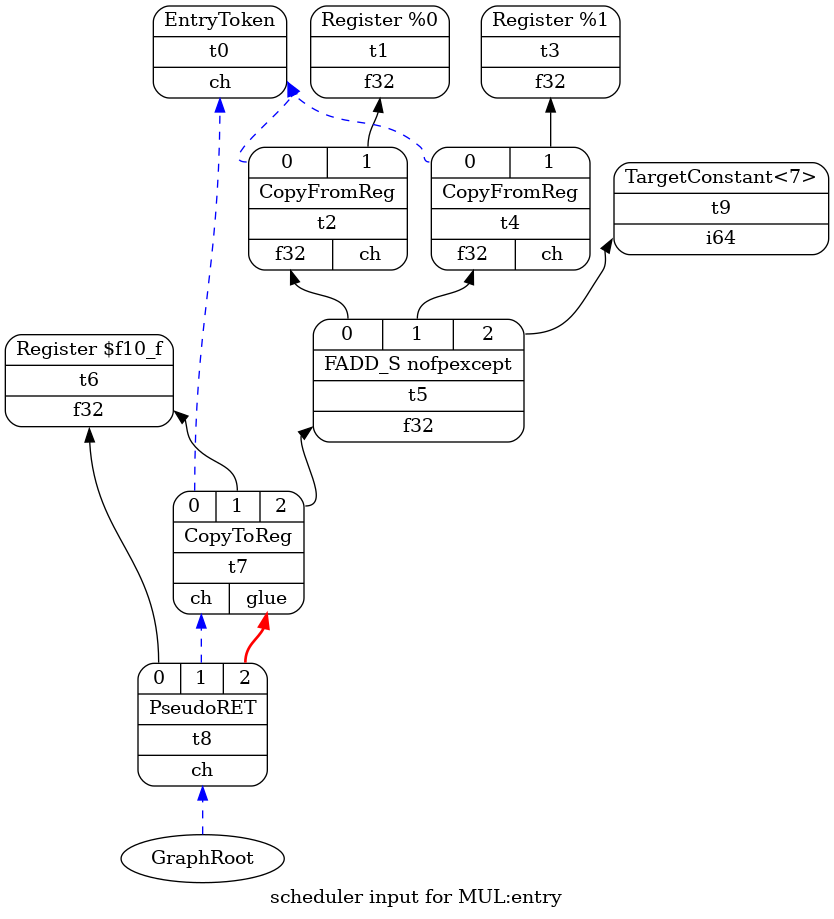
通过 `riscv-llc test.bc -view-sched-dags` 查看 isel 的结果为:

通过 `llc test.bc -debug` 生成 isel debug 信息:
ISEL: Starting selection on root node: t5: f32 = fadd t2, t4
ISEL: Starting pattern match
  Initial Opcode index to 1373928
  TypeSwitch[f32] from 1373932 to 1373969
Creating constant: t9: i64 = TargetConstant<7>
  Morphed node: t5: f32 = FADD_S nofpexcept t2, t4, TargetConstant:i64<7>
ISEL: Match complete!
debug 中的 opcode index 是 RISCVGenDAGISel.inc 中 MatcherTable 中的偏移量.
下面的 RISCVGenDAGISel.inc, 相当于下面的 switch-case 代码:
switch (opcode):
  case `fadd`:
    switch (return_type):
      case f16:
        /* ... */
        break;
      case f32:
        if check_pattern_predicate (35):
          return FADD_S
RISCVGenDAGISel.inc:
/*1373923*/ /*SwitchOpcode*/ 1|128,11|128,1/*17793*/, TARGET_VAL(ISD::FADD),// ->1391721
/*1373928*/  OPC_Scope, 106, /*->1374036*/ // 9 children in Scope
/*1373930*/   OPC_RecordChild0, // #0 = $rs1
/*1373931*/   OPC_RecordChild1, // #1 = $rs2
/*1373932*/   OPC_SwitchType /*3 cases */, 32, MVT::f16,// ->1373967
...
/*1373967*/   /*SwitchType*/ 32, MVT::f32,// ->1374001
/*1373969*/    OPC_Scope, 14, /*->1373985*/ // 2 children in Scope
/*1373971*/     OPC_CheckPatternPredicate, 35, // (Subtarget->hasStdExtF()) && (MF->getSubtarget().checkFeatures("+64bit"))
/*1373973*/     OPC_EmitInteger, MVT::i64, 14,
/*1373976*/     OPC_MorphNodeTo1, TARGET_VAL(RISCV::FADD_S), 0,
                   MVT::f32, 3/*#Ops*/, 0, 1, 2,
               // Src: (fadd:{ *:[f32] } FPR32:{ *:[f32] }:$rs1, FPR32:{ *:[f32] }:$rs2) - Complexity = 3
               // Dst: (FADD_S:{ *:[f32] } ?:{ *:[f32] }:$rs1, ?:{ *:[f32] }:$rs2, 7:{ *:[i64] })
OPC_Scope 相当于 switch…case 中当前 case 的大小.
inc 中的 `SwitchOpcode` 和 `MVT:F32` 的 case 是通过 td 中的 pat 生成的:
def : PatFprFprDynFrm<any_fadd, FADD_S, FPR32>;
`OPC_CheckPatternPredicate, 35` 和 是根据 FADD_S 要求的 predicate 生成的:
defm FADD_S : FPALU_rr_frm_m<0b0000000, "fadd.s", FINX>;
其中 FINX 通过 tablegen 展开后会包含 hasStdExtF 这个 predicate
另外, td 文件除了包含 isel 需要的 pattern, 还包含 codegen 需要的汇编指令和机器指令信息, scheduler 需要的 sched 信息, disassembler 需要的汇编和机器指令信息以及寄存器信息等.
1.3.6. peephole
PostprocessISelDAG 可以在生成 MachineDAG 后对它进行一些 peephole 优化
1.4. MachineInstr
instruction selection 的输出是 MachineDAG, scheduler 在调度之前会先通过
InstrEmitter 的 EmitMachineNode 把 MachineDAG 转换为 MachineInstr, MachineInstr
也称为 MIR
MachineInstr 包含许多对优化有用的信息, 后续各种 MachineFunctionPass 可以通过操作 MachineInstr 进行各种优化, 有点类似于 gcc 的 rtl pass
针对 MachineInstr 及 MachineFunctionPass 的 debug 方法:
- 通过 `llc test.bc -print-after-all` 能看到各个 MachineFunctionPass 处理过的 MachineInstr:
- 通过 `lcc test.bc -stop-after=xxx` 看到某个 pass 处理后的 MachineInstr, 例如 `llc test.bc -stop-after=riscv-isel -o test.mir`
- `llc -run-pass=xxx test.mir -o test2.mir`
- `llc -start-after=xxx test2.mir -o test.s`
# *** IR Dump After Finalize ISel and expand pseudo-instructions (finalize-isel) ***:
# Machine code for function foo: IsSSA, TracksLiveness
Frame Objects:
  fi#0: size=8, align=8, at location [SP]
  fi#1: size=8, align=8, at location [SP]
Function Live Ins: $x10 in %0, $x11 in %1

bb.0.entry:
  liveins: $x10, $x11
  %1:gpr = COPY $x11
  %0:gpr = COPY $x10
  SD %0:gpr, %stack.0.x.addr, 0 :: (store (s64) into %ir.x.addr)
  SD %1:gpr, %stack.1.y.addr, 0 :: (store (s64) into %ir.y.addr)
  %2:gpr = LD %stack.1.y.addr, 0 :: (dereferenceable load (s64) from %ir.y.addr)
  %3:gpr = LD %stack.0.x.addr, 0 :: (dereferenceable load (s64) from %ir.x.addr)
  %4:gpr = nsw SUB killed %3:gpr, killed %2:gpr
  SD killed %4:gpr, %stack.0.x.addr, 0 :: (store (s64) into %ir.x.addr)
  PseudoRET
1.5. scheduler
scheduler 的输入是一系列的 MachineInstr, 使用的 schedule 信息来自 tablegen, 包括
- Latency
- ResourceCycles
- ProcResourceKind
例如:
defm FSQRT_S : FPUnaryOp_r_frm_m<0b0101100, 0b00000, FFINX, "fsqrt.s">,
               Sched<[WriteFSqrt32, ReadFSqrt32]>;

def : WriteRes<WriteFSqrt32, [SiFive7PipeB, SiFive7FDiv]> { let Latency = 27;
                                                          let ResourceCycles = [1, 26]; }
表示 FSQRT_S 需要使用两个 `cpu unit`/`proc resource` 分别为 SiFive7PipeB, SiFive7FDiv, 指令的 latency 为 27, SiFive7PipeB 需要一个 cycle, SiFive7FDiv 需要 26 个 cycle.
这个定义与 gcc sifive7.md 中的定义是一致的:
(define_insn_reservation "sifive_7_fdiv_s" 27
  (and (eq_attr "tune" "sifive_7")
       (eq_attr "type" "fdiv,fsqrt")
       (eq_attr "mode" "SF"))
  "sifive_7_B,sifive_7_fpu*26")
1.6. register allocation
scheduleing 之后进行 register allocation, 然后会再进行一次 scheduling.
register allocation 前会先进行 PHI node 的消除 (PHIElimination), 把 PHI 替换成 vreg, 并且在每个相关 BB 中插入 COPY, 例如:
# *** IR Dump After Live Variable Analysis (livevars) ***:
# Machine code for function main: IsSSA, TracksLiveness
Function Live Ins: $x10 in %2

bb.0 (%ir-block.2):
  successors: %bb.2(0x50000000), %bb.1(0x30000000); %bb.2(62.50%), %bb.1(37.50%)
  liveins: $x10
  %2:gpr = COPY killed $x10
  %6:gpr = COPY $x0
  BLT %6:gpr, %2:gpr, %bb.2

bb.1:
; predecessors: %bb.0
  successors: %bb.3(0x80000000); %bb.3(100.00%)

  %5:gpr = COPY killed %6:gpr
  PseudoBR %bb.3

bb.2 (%ir-block.4):
; predecessors: %bb.0
  successors: %bb.3(0x80000000); %bb.3(100.00%)

  %7:gpr = ADDIW %2:gpr, -1
  %8:gpr = ADDIW killed %2:gpr, -2
  %9:gpr = SLLI killed %8:gpr, 32
  %10:gpr = SLLI %7:gpr, 32
  %11:gpr = MULHU killed %10:gpr, killed %9:gpr
  %12:gpr = SRLI killed %11:gpr, 1
  %0:gpr = ADDW killed %7:gpr, killed %12:gpr

bb.3 (%ir-block.14):
; predecessors: %bb.2, %bb.1

  %1:gpr = PHI %5:gpr, %bb.1, %0:gpr, %bb.2
  $x10 = COPY killed %1:gpr
  PseudoRET implicit killed $x10

# End machine code for function main.

# *** IR Dump After Eliminate PHI nodes for register allocation (phi-node-elimination) ***:
# Machine code for function main: NoPHIs, TracksLiveness
Function Live Ins: $x10 in %2

bb.0 (%ir-block.2):
  successors: %bb.2(0x50000000), %bb.1(0x30000000); %bb.2(62.50%), %bb.1(37.50%)
  liveins: $x10
  %2:gpr = COPY killed $x10
  %6:gpr = COPY $x0
  BLT %6:gpr, %2:gpr, %bb.2

bb.1:
; predecessors: %bb.0
  successors: %bb.3(0x80000000); %bb.3(100.00%)

  %5:gpr = COPY killed %6:gpr
  %13:gpr = COPY killed %5:gpr
  ~~~~~~~~~~~~~~~~~~~~~~~~~~~~
  PseudoBR %bb.3

bb.2 (%ir-block.4):
; predecessors: %bb.0
  successors: %bb.3(0x80000000); %bb.3(100.00%)

  %7:gpr = ADDIW %2:gpr, -1
  %8:gpr = ADDIW killed %2:gpr, -2
  %9:gpr = SLLI killed %8:gpr, 32
  %10:gpr = SLLI %7:gpr, 32
  %11:gpr = MULHU killed %10:gpr, killed %9:gpr
  %12:gpr = SRLI killed %11:gpr, 1
  %0:gpr = ADDW killed %7:gpr, killed %12:gpr
  %13:gpr = COPY killed %0:gpr
  ~~~~~~~~~~~~~~~~~~~~~~~~~~~~

bb.3 (%ir-block.14):
; predecessors: %bb.2, %bb.1

  %1:gpr = COPY killed %13:gpr
  ~~~~~~~~~~~~~~~~~~~~~~~~~~~~
  $x10 = COPY killed %1:gpr
  PseudoRET implicit killed $x10

# End machine code for function main.
1.7. prologue/epilogue
1.8. codegen
https://blog.llvm.org/2010/04/intro-to-llvm-mc-project.html
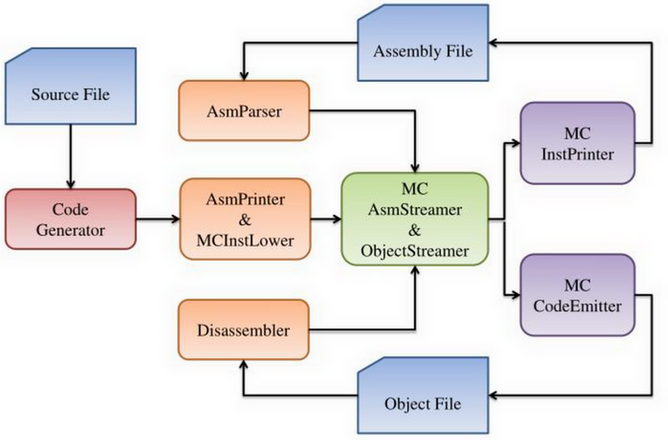
AsmPrinter 的 emitFunction 会把 MachineInstr 转换为 MCInst, 然后再通过 MCCodeEmitter 的 encodeInstruction 生成最终的 object 或汇编
MCInst 比 MachineInstr 带的信息更少, 主要用于输出汇编或 object, 并且可以做为汇编与 object 转换的中间桥梁:

